Posted by MedicalNewsToday - Medically reviewed by Deborah Weatherspoon, Ph.D., R.N., CRNA — Written by Amanda Barrell — Updated on June 10, 2020 on May 2nd 2021
CPR steps: A visual guide
CPR steps: A visual guide
Using the CPR steps on someone who is not breathing can help keep them alive until the emergency services arrive.
CPR works by keeping a person’s blood flowing until healthcare professionals can help them. People without first aid training can still save a life by using the CPR steps.
When a person initiates CPR immediately after someone’s heart stops beating, CPR can double or even triple the chances of them surviving.
In this article, we provide a step-by-step visual guide to performing CPR.

Use CPR when an adult is not breathing or when they are only gasping occasionally, and when they are not responding to questions or taps on the shoulder.
In children and infants, use CPR when they are not breathing normally and not responding.
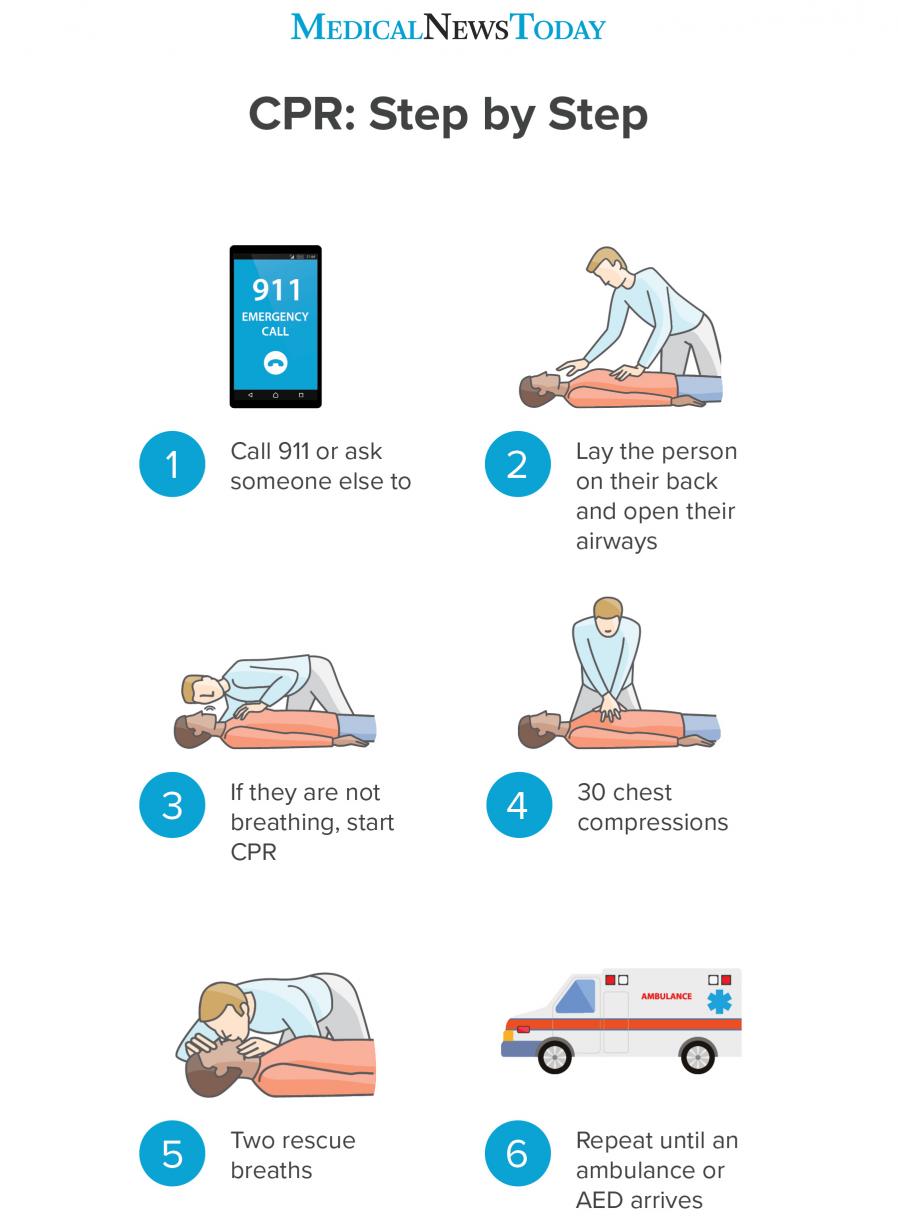
Check that the area is safe, then perform the following basic CPR steps:
- Call 911 or ask someone else to.
- Lay the person on their back and open their airway.
- Check for breathing. If they are not breathing, start CPR.
- Perform 30 chest compressions.
- Perform two rescue breaths.
- Repeat until an ambulance or automated external defibrillator (AED) arrives.
Read on for more detailed descriptions of how to perform CPR in adults, children, and infants.
There are two main stages to CPR: the preparation stage and the CPR stage.
Preparation steps
Before performing CPR on an adult, use the following preparation steps:
Step 1. Call 911
First, check the scene for factors that could put you in danger, such as traffic, fire, or falling masonry. Next, check the person. Do they need help? Tap their shoulder and shout, “Are you OK?”
If they are not responding, call 911 or ask a bystander to call 911 before performing CPR. If possible, ask a bystander to go and search for an AED machine. People can find these in offices and many other public buildings.
Step 2. Place the person on their back and open their airway
Place the person carefully on their back and kneel beside their chest. Tilt their head back slightly by lifting their chin.
Open their mouth and check for any obstruction, such as food or vomit. Remove any obstruction if it is loose. If it is not loose, trying to grasp it may push it farther into the airway.
Step 3. Check for breathing
Place your ear next the person’s mouth and listen for no more than 10 seconds. If you do not hear breathing, or you only hear occasional gasps, begin CPR.
If someone is unconscious but still breathing, do not perform CPR. Instead, if they do not seem to have a spinal injury, place them in the recovery position. Keep monitoring their breathing and perform CPR if they stop breathing.
CPR steps
Use the following steps to perform CPR:
Step 4. Perform 30 chest compressions
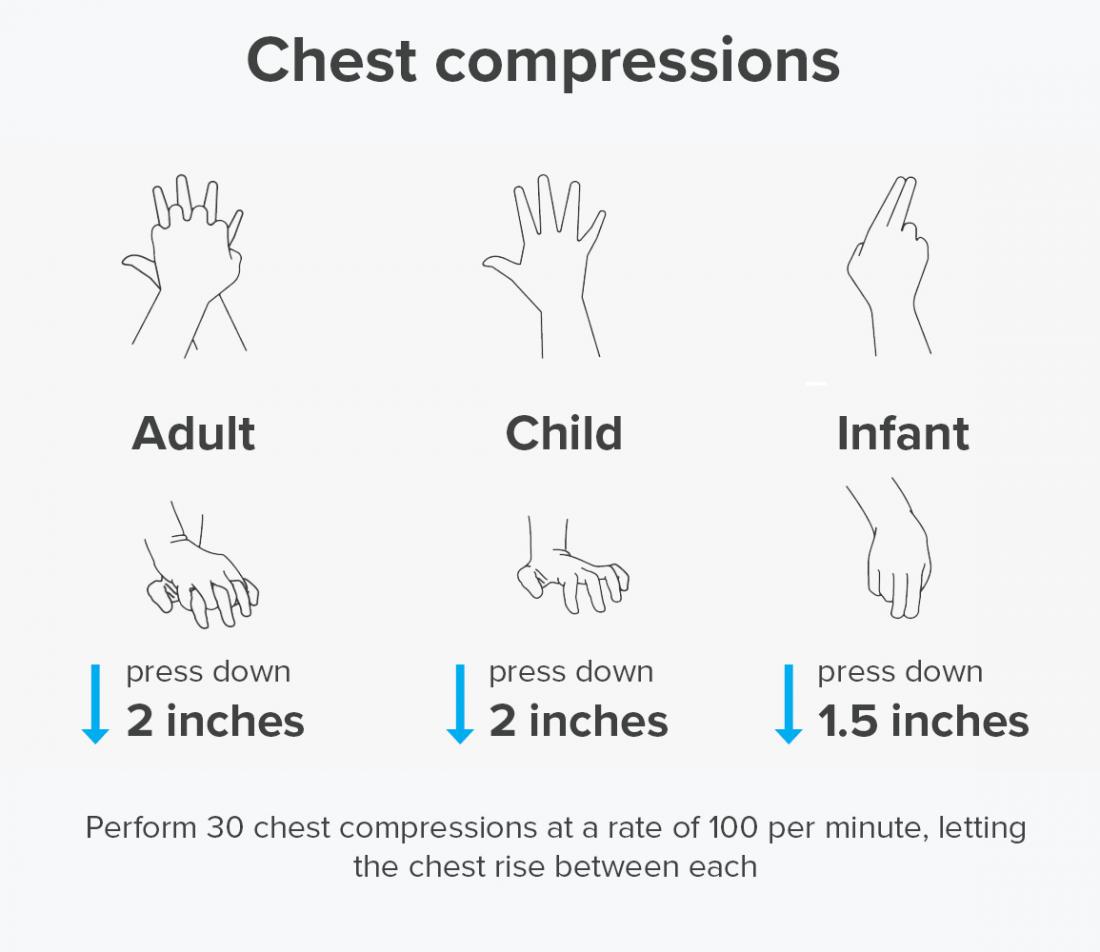
Place one of your hands on top of the other and clasp them together. With the heel of the hands and straight elbows, push hard and fast in the center of the chest, slightly below the nipples.
Push at least 2 inches deep. Compress their chest at a rate of least 100 times per minute. Let the chest rise fully between compressions.

Step 5. Perform two rescue breaths
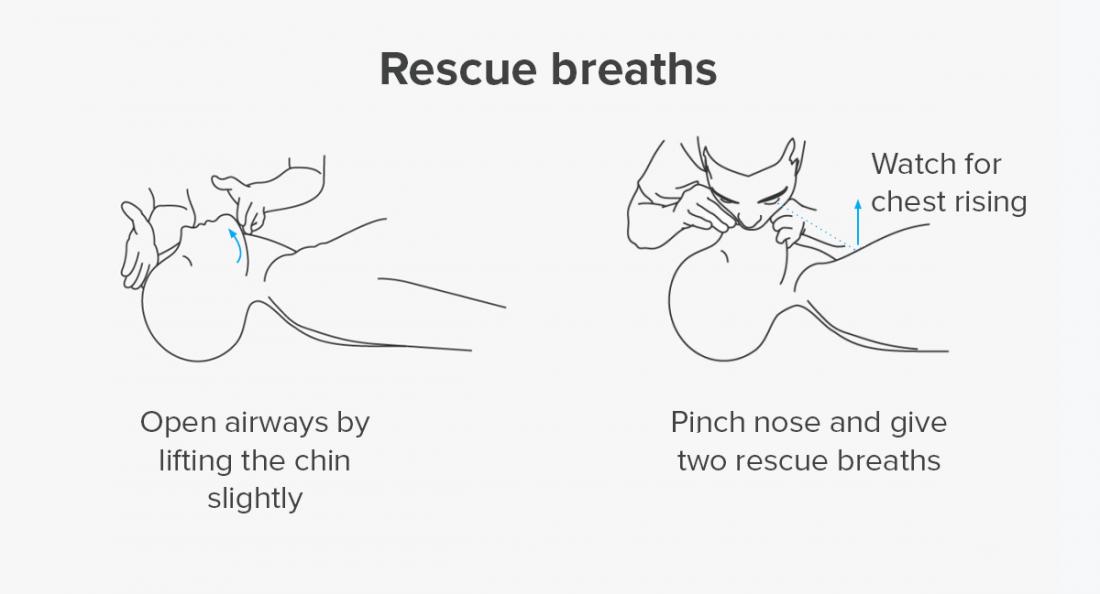
Making sure their mouth is clear, tilt their head back slightly and lift their chin. Pinch their nose shut, place your mouth fully over theirs, and blow to make their chest rise.
If their chest does not rise with the first breath, retilt their head. If their chest still does not rise with a second breath, the person might be choking.

Step 6. Repeat
Repeat the cycle of 30 chest compressions and two rescue breaths until the person starts breathing or help arrives. If an AED arrives, carry on performing CPR until the machine is set up and ready to use.
The CPR steps for children and infants are slightly different to the steps for adults, as below.
Preparation steps
To perform CPR on an infant or child, use the following preparation steps:
Step 1. Call 911 or give 2 minutes of care
First, check the surrounding area for factors that could put you in danger. Next, check the child or infant to see whether they need help. For children, tap their shoulder and shout, “Are you OK?” For infants, flick the sole of their foot to see if they respond.
If you are alone with the child and they are not responding, give them 2 minutes of care and then call 911. If there is a bystander, ask them to call 911 while you give 2 minutes of care.
If possible, ask a bystander to go and search for an AED machine. Offices and other public buildings tend to house these.
If the child does respond, call 911 to report any life-threatening conditions.
Step 2. Place them on their back and open their airways
Place the child or infant carefully on their back and kneel beside their chest. Tilt their head backward slightly by lifting their chin.
Open their mouth. Check for any obstruction, such as food or vomit. If it is loose, remove it. If it is not loose, do not touch it, as this may push it farther into their airways.
Step 3. Check for breathing
Place your ear next to their mouth and listen for around 10 seconds. If you do not hear breathing, or you only hear occasional gasps, begin to administer CPR.
Changes in an infant’s breathing patterns are normal, as they usually have periodic breathing.
Keep monitoring their breathing and perform CPR if they stop breathing.
CPR steps
Use the following steps to perform CPR on a child or infant:
Step 4. Perform two rescue breaths
If the child or infant is not breathing, perform two rescue breaths with their head tilted backward and their chin raised.
For a child, pinch their nose shut and place your mouth over theirs. Breathe into their mouth twice.
For an infant, place your mouth over their nose and mouth and blow for 1 second to make their chest rise. Then, deliver two rescue breaths.
If they are still unresponsive, begin chest compressions.
Step 5. Perform 30 chest compressions
Kneel beside the child or infant.
For a child, use one of your hands. Place the heel of the hand at their sternum, which is in the center of the chest, between and slightly below their nipples. Press down hard and fast around 2 inches deep, or one-third the depth of the chest, at least 100 times per minute.
For an infant, use two fingers. Place your fingers in the center of their chest, between and slightly below the nipples. Perform 30 quick compressions around 1.5 inches deep.
Step 6. Repeat
Repeat the cycle of rescue breaths and chest compressions until the child starts breathing or help arrives.
When to use CPR and when not to
Use CPR when an adult is not breathing at all. For a child or infant, use CPR when they are not breathing normally. Always use CPR if the adult or child is not responding when you talk to them or tap them.
If someone is not breathing, giving CPR can ensure that oxygen-rich blood reaches the brain. This is important, as without oxygen, someone can sustain permanent brain damage or die in under 8 minutes.
A person might need CPR if they stop breathing in any of the following circumstances:
- a cardiac arrest or heart attack
- choking
- a road traffic accident
- near-drowning
- suffocation
- poisoning
- a drug or alcohol overdose
- smoke inhalation
- electrocution
- suspected sudden infant death syndrome
Only perform CPR if the adult is not breathing, or in children and infants, when they are not breathing normally, and their blood is not circulating. This is why it is important to ensure that the person does not respond to verbal or physical calls to attention before starting the CPR process.
CPR is a life-saving first aid procedure. It can significantly improve someone’s changes of surviving if they suffer a heart attack or stop breathing following an accident or trauma.
The steps vary depending on whether the person is an infant, child, or adult. However, the basic cycle of chest compressions and rescue breaths will remain the same.
Only use CPR when an adult has stopped breathing. Check the person to see whether they respond to verbal or physical stimuli before starting CPR.